Daycare.com Forum
Daycare Center and Family Home Forum>What Do You Think?
spud912 10:15 PM 08-30-2012
I wanted to do this with the kids tomorrow, but got excited and did it by myself just now. Good thing, because there wasn't much they could do! I saw it online and thought it was a great idea for a daycare room decoration. I tried taping up the silouette, but unfortunately some orange got behind the tape, and now it's all my eyes can look at (darn it!!). What do you all think?

Breezy 11:09 PM 08-30-2012
I have seen this on pinterest and I think it looks just like the original. Looks great!!!
countrymom 04:28 AM 08-31-2012
my odd did this and entered in our fair this weekend. She painted the background black. She also used a hair dryer. Very time comsuming. But the outlook is great.
nanglgrl 05:08 AM 08-31-2012
I did this a while back and you're right, there's not much for the kids to do. They did however look at me like I was awesome when it was done! Where did you get the silhouette? I didn't have that on mine.
SquirrellyMama 06:08 AM 08-31-2012
That is very cool! K
Crazy8 06:27 AM 08-31-2012
cute! my dd and her friend made one - they are 12 and I even helped guide them a bit so yeah, probably not anything the little kids can do.
Here is theirs - the heart was done in contact paper but one corner started to peel up while they were melting so they ended up painting it white to try to fix it up a little.
Here is theirs - the heart was done in contact paper but one corner started to peel up while they were melting so they ended up painting it white to try to fix it up a little.
countrymom 07:08 AM 08-31-2012
if you have a cricut machine you can cut out the shape.
spud912 07:40 AM 08-31-2012
Originally Posted by nanglgrl:
I did this a while back and you're right, there's not much for the kids to do. They did however look at me like I was awesome when it was done! Where did you get the silhouette? I didn't have that on mine.
I found a silhouette online, printed it on cardstock, cut it out and traced it. I ended up drawing a lot of it in though because the traced pattern didn't look much like the original. Then I colored it in with a black marker.I did this a while back and you're right, there's not much for the kids to do. They did however look at me like I was awesome when it was done! Where did you get the silhouette? I didn't have that on mine.
spud912 07:40 AM 08-31-2012
Originally Posted by Crazy8:
cute! my dd and her friend made one - they are 12 and I even helped guide them a bit so yeah, probably not anything the little kids can do.
Here is theirs - the heart was done in contact paper but one corner started to peel up while they were melting so they ended up painting it white to try to fix it up a little.
Looks great!!cute! my dd and her friend made one - they are 12 and I even helped guide them a bit so yeah, probably not anything the little kids can do.
Here is theirs - the heart was done in contact paper but one corner started to peel up while they were melting so they ended up painting it white to try to fix it up a little.
Blackcat31 09:19 AM 08-31-2012
What a super neat art/craft idea!!!
Can someone post directions or how to...I don't get how you get the crayons to run
Can someone post directions or how to...I don't get how you get the crayons to run
MyAngels 11:23 AM 08-31-2012
Originally Posted by Blackcat31:
What a super neat art/craft idea!!!
Can someone post directions or how to...I don't get how you get the crayons to run
Here you go:What a super neat art/craft idea!!!
Can someone post directions or how to...I don't get how you get the crayons to run
http://megduerksen.typepad.com/whate...-make-one.html
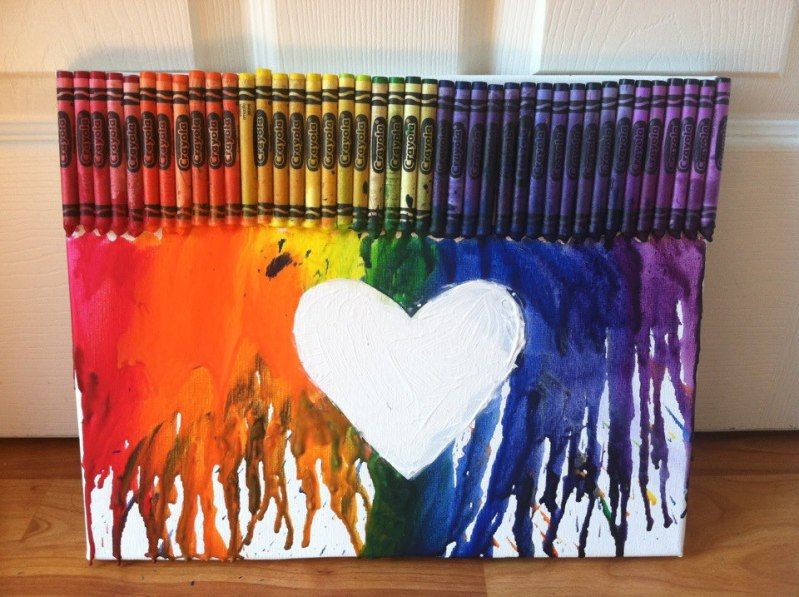
spud912 01:53 PM 08-31-2012
Originally Posted by Blackcat31:
What a super neat art/craft idea!!!
Can someone post directions or how to...I don't get how you get the crayons to run
It's super easy and cheap. This is how I did it:What a super neat art/craft idea!!!
Can someone post directions or how to...I don't get how you get the crayons to run
- Arrange crayons in rainbow scheme
- Use the glue gun to attach the crayons along the top of the canvas. I did it with the "Crayola" name sticking out.
- Find a sillouette online, print it and cut it out.
- Trace around the silouette onto the canvas with a pencil.
- Color in the silouette with a black Sharpie marker. I didn't have one so I just used a regular black marker.
- Place painter's (or masking) tape on top of the silouette.
- Set up the surrounding area with newspaper because the crayons spatter.
- Blow dry the crayons until they start dripping. I found it's best to start at high heat and high volume until the crayons start dripping a lot. Sweep back and forth on the crayons. To get the crayons to drizzle all the way to the bottom, I turned down the volume to medium (but still on high heat), and swept downward.
- Remove the painter's tape.
The prep time took me about an hour and the blow drying took 30 minutes.
I used a 24x18 inch canvas (Wal-Mart for $15, sold in packs of 2) and a 96 count box of Crayola crayons (Wal-Mart for $5). I used approximately 86 crayons, so pretty much the whole box. All in all, it costs about $13 for the whole project, which isn't bad for a nice big picture. By the way, the kids LOVED it.
Blackcat31 02:12 PM 08-31-2012
Originally Posted by spud912:
It's super easy and cheap. This is how I did it:
The prep time took me about an hour and the blow drying took 30 minutes.
I used a 24x18 inch canvas (Wal-Mart for $15, sold in packs of 2) and a 96 count box of Crayola crayons (Wal-Mart for $5). I used approximately 86 crayons, so pretty much the whole box. All in all, it costs about $13 for the whole project, which isn't bad for a nice big picture. By the way, the kids LOVED it.
Thanks ladies!! I am totally going to try this! It's super easy and cheap. This is how I did it:
- Arrange crayons in rainbow scheme
- Use the glue gun to attach the crayons along the top of the canvas. I did it with the "Crayola" name sticking out.
- Find a sillouette online, print it and cut it out.
- Trace around the silouette onto the canvas with a pencil.
- Color in the silouette with a black Sharpie marker. I didn't have one so I just used a regular black marker.
- Place painter's (or masking) tape on top of the silouette.
- Set up the surrounding area with newspaper because the crayons spatter.
- Blow dry the crayons until they start dripping. I found it's best to start at high heat and high volume until the crayons start dripping a lot. Sweep back and forth on the crayons. To get the crayons to drizzle all the way to the bottom, I turned down the volume to medium (but still on high heat), and swept downward.
- Remove the painter's tape.
The prep time took me about an hour and the blow drying took 30 minutes.
I used a 24x18 inch canvas (Wal-Mart for $15, sold in packs of 2) and a 96 count box of Crayola crayons (Wal-Mart for $5). I used approximately 86 crayons, so pretty much the whole box. All in all, it costs about $13 for the whole project, which isn't bad for a nice big picture. By the way, the kids LOVED it.

Country Kids 02:26 PM 08-31-2012
I have some little canvas's so I think I'll do this with SA when they have a day off!
Blackcat31 06:29 AM 09-03-2012
This was such a cool idea that I couldn't resist and HAD to do this myself over the weekend! It was so fun and super easy to do! My DH helped out and even he thought it was a really neat idea. Here are our results:
rbmom 08:38 AM 09-03-2012
Awesome idea!! And all of the ones pictured look so good!
BumbleBee 05:00 PM 09-03-2012
Cool! Definately going to do this when I get some free time!